
Moon Knights mask made out of cardboard and tape! It has an Egyptian mummy vibe. Overall, I like how it turned out, but to be honest, I wasn’t sure if I was going to post this one since it is a little messy… but I hope you guys like it!
If I was going to wear this as a cosplay and not just for fun around the house, I would cover the cape in tape and partly it the same way as everything else.
But it still looks pretty good without all that extra work. Oh and visibility is pretty good in it too! Enjoy!
Materials List:
- Computer Paper: https://amzn.to/3B8NpDP
- Chipboard (I used old cereal boxes): https://amzn.to/3omh7xE
- Corrugated cardboard: https://amzn.to/3IW9mb6
- Scissors: https://amzn.to/3v6srlg
- Utility blade: https://amzn.to/3orJXMV
- Glue gun: https://amzn.to/3PwdPnp
- Glue sticks: https://amzn.to/3PFlX4w
- Craft paint (black, brown, white): https://amzn.to/3v4YUZ2
- Paint Brushes: https://amzn.to/3OluJnf
- Masking Tape: https://amzn.to/3Pv8RaG
- Stapler: https://amzn.to/3aW97Ah
- Screen Mesh: https://amzn.to/3aTNT6j
- Tin Foil: https://amzn.to/3IV2QBo
- Wax Paper: https://amzn.to/3aYCCBE
* Disclosure: Some of the links above are affiliate links. This means that, at zero cost to you, I will earn an affiliate commission if you click through the link and finalize a purchase. Thank you! *
Steps to Make A Moon Knight Mask:
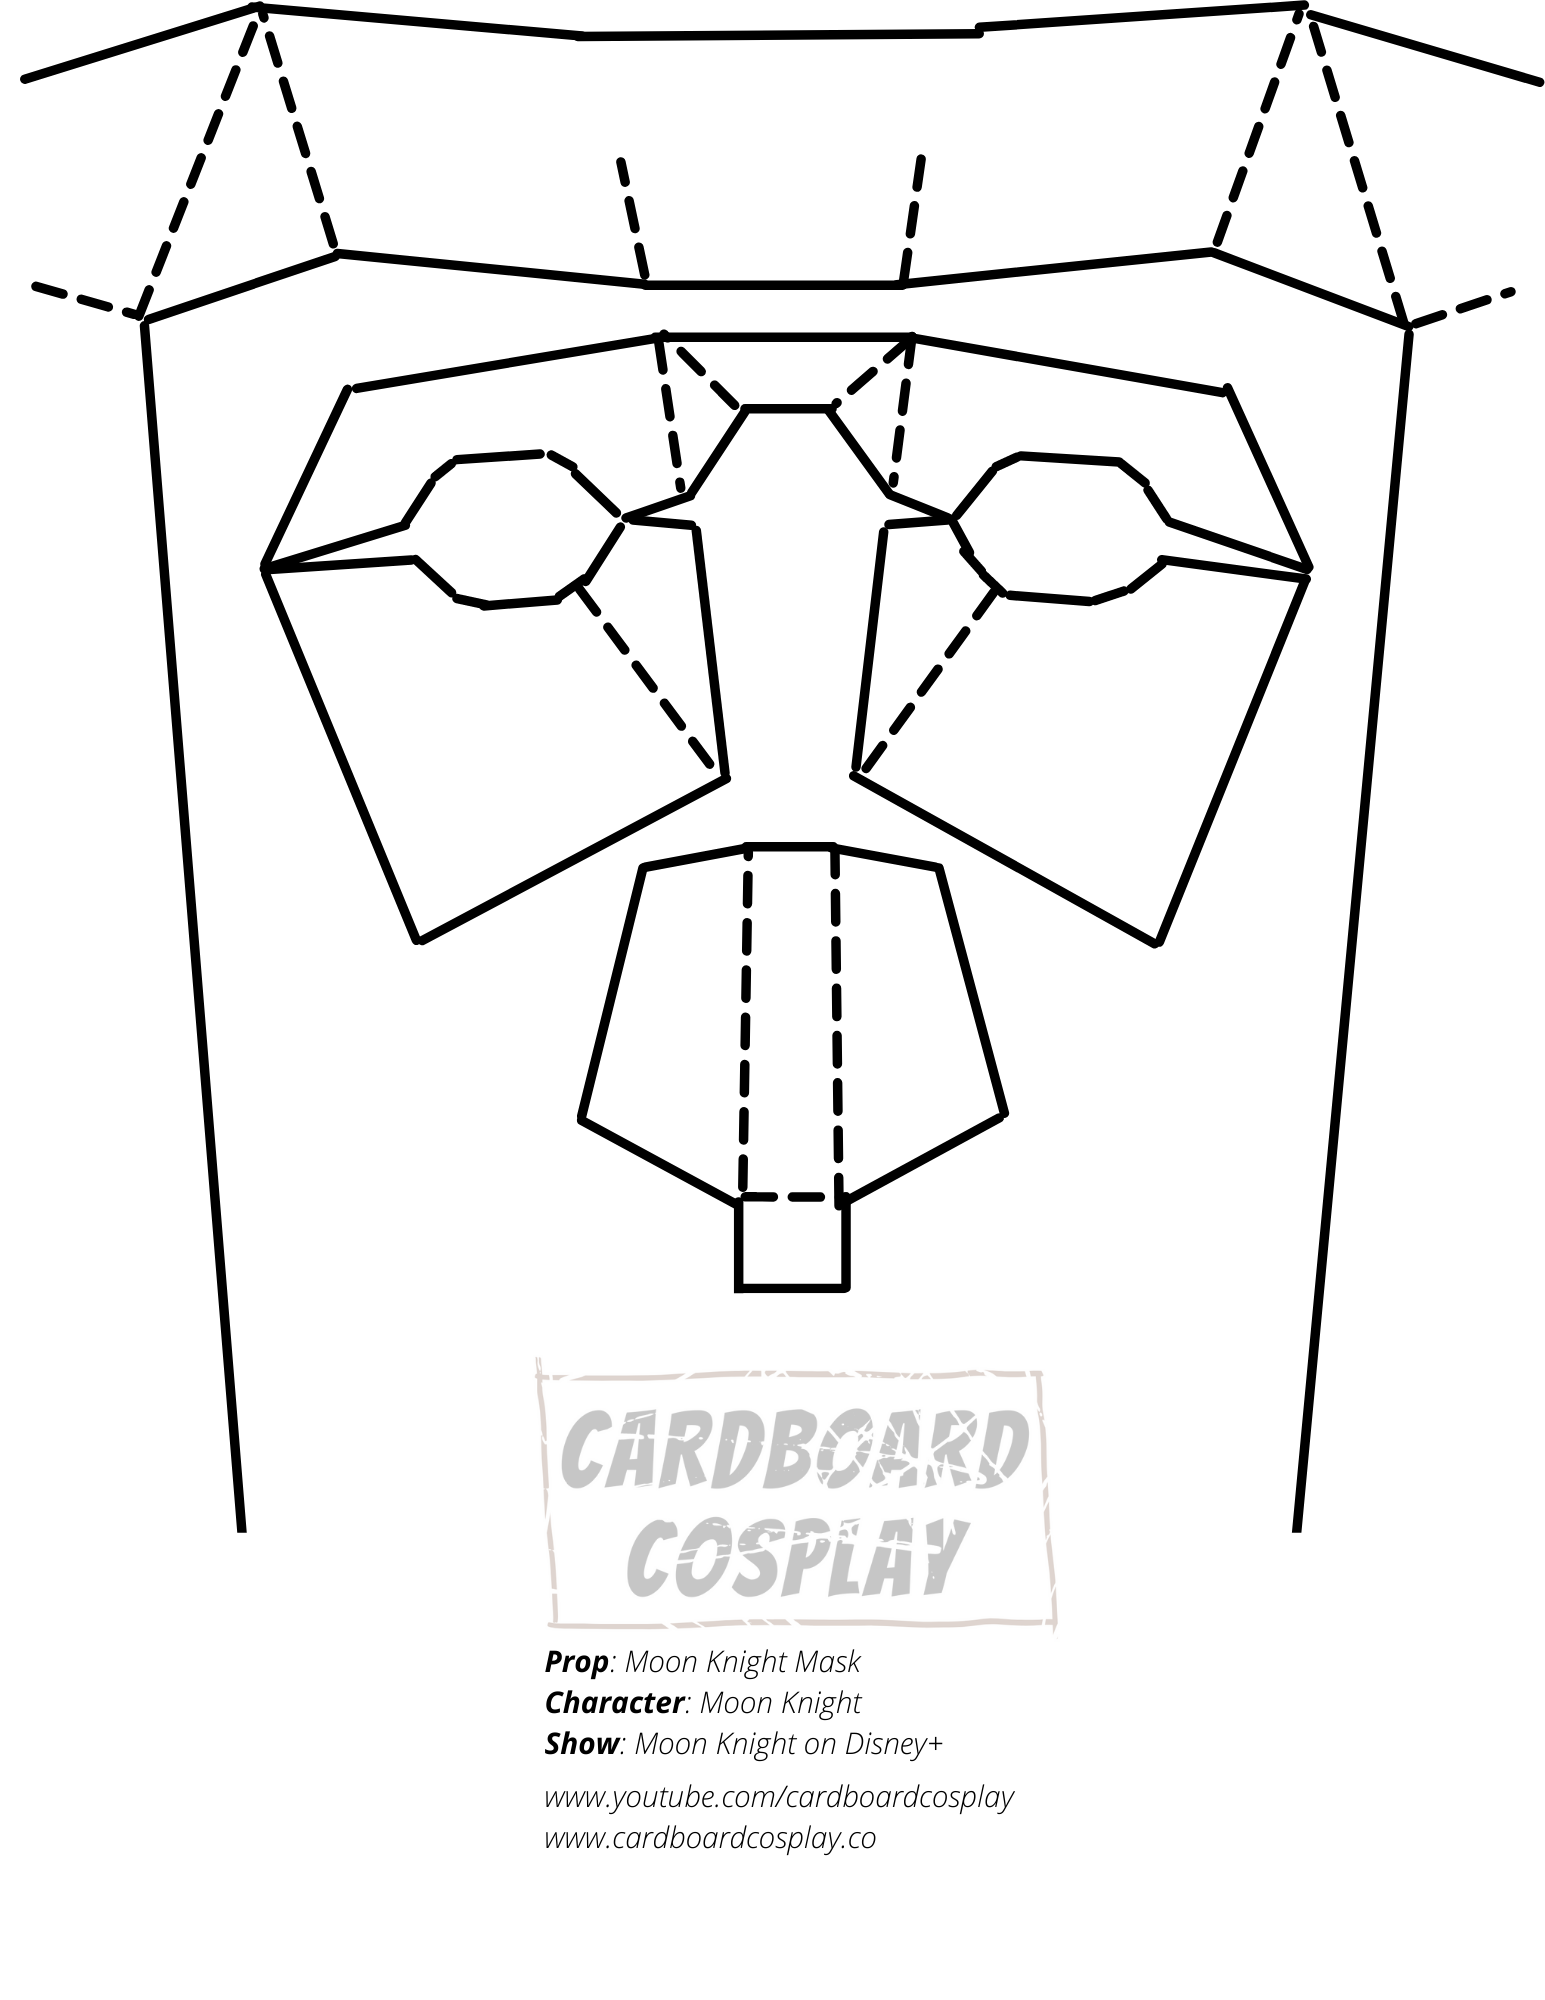
- Print out the template.
- Cut all the pieces out of the template and tape them into cereal box.
- Cut the pieces out.
- Fold along the dotted lines.
- Tape pieces together. Tip: it’s easiest to start with the nose first.
- When you have the mask taped together, try it on. Wrap the long strips on either side of the mask around your chin so it fits comfortably. Staple the two pieces together.
- Staple on the ear covers and then staple those two pieces together so the mask holds its shape.
- For your forehead, press a sheet of aluminum foil against your head. Cover in tape.
- Take off your forehead and cover the inside of it with tape so no more foil is showing.
- Tape/Staple onto your mask.
- Cover the gap and the entire eye section in more masking tape.
- Wraps:
- Take a piece of wax paper that’s about 16 inches long. Lay it out in front of you and lay on long strips of tape.
- Cut sheet into strips.
- Hot glue strips onto the mask starting with the nose, chin and forehead.
- Tips:
- use a reference photo of the real mask for the exact pattern of the wrapping. It starts at the cheeks and slants down over the mouth and then alternates to the other side.
- Keep your strips slanted and with the thickness of two of the masking tape straps.
- Always make sure the smooth side of the wax paper is down. You want the rough side up because all that texture helps make the tape look like fabric once it is painted.
- Glue down all the extra bits that are hanging off of it.
- Replace the staples on the back with elastic so you can wear the mask.
- Paint:
- Paint everything in white craft paint.
- When dried, paint in a watered down wash of black craft paint.
- When dried, paint in a watered down wash of brown craft paint.
- Keep it slightly darker around the eyes.
- For the eyes, paint a piece of screen white and hot glue into the eye sockets on the inside of the mask.
- Hood:
- Trace a hoodie onto a white plastic table cloth two times (or once if your table cloth is folded in half)
- Fabric, paper, plastic bags, etc will all work too.
- Cut out the 2 pieces.
- Cut out a long 3 inch wide strip.
- Tape the 3 pieces together.
- Cover in tape in an alternating pattern.
- Basically the tape goes one way for 1 third of the hood. A different way for another third. And then straight up and down for the back of the hood.
- Trace a hoodie onto a white plastic table cloth two times (or once if your table cloth is folded in half)
- The little crescent moon in the center of his hood:
- tape down a cereal box cardboard triangle and then cut a crescent moon out of corrugated cardboard. Tape down moon.
- Paint hood in white, a very light black wash, and then a very light brown wash. All craft paint.
- Tie the rest of the table cloth around your neck to act as the cape.
- Fasten the hood together with a piece of tape.
- Enjoy!
Template:
**prints out on one page of regular computer paper (8.5×11 inch)**