When I first saw Avatar: The Last Airbender, I was instantly taken by the beautiful world crafted by the show’s creators. Every detail felt so unique and fresh. It’s a wonderful example of world building.
There are so many spectacularly designed props and costumes in the show. One of my favorites is the bison whistle that Aang buys in the market. It’s a simple prop that ends up playing a key role in several episodes. I instantly loved it’s design and wanted one. So I finally made it! It’s a simple build that just requires some patience. Made completely out of cardboard, including the whistle….however you can choose to swap in a metal or plastic whistle if you want a louder noise.
Material List:
- Computer Paper: https://amzn.to/3B8NpDP
- Chipboard (I used old cereal boxes): https://amzn.to/3omh7xE
- Corrugated cardboard: https://amzn.to/3IW9mb6
- Scissors: https://amzn.to/3v6srlg
- Utility blade: https://amzn.to/3orJXMV
- Glue gun: https://amzn.to/3PwdPnp
- Glue sticks: https://amzn.to/3PFlX4w
- Craft paint https://amzn.to/3v4YUZ2
- Paint Brushes: https://amzn.to/3OluJnf
- Masking Tape: https://amzn.to/3Pv8RaG
- Whistle: https://amzn.to/3zooRFy
* Disclosure: Some of the links above are affiliate links. This means that, at zero cost to you, I will earn an affiliate commission if you click through the link and finalize a purchase. Thank you! *
Steps:
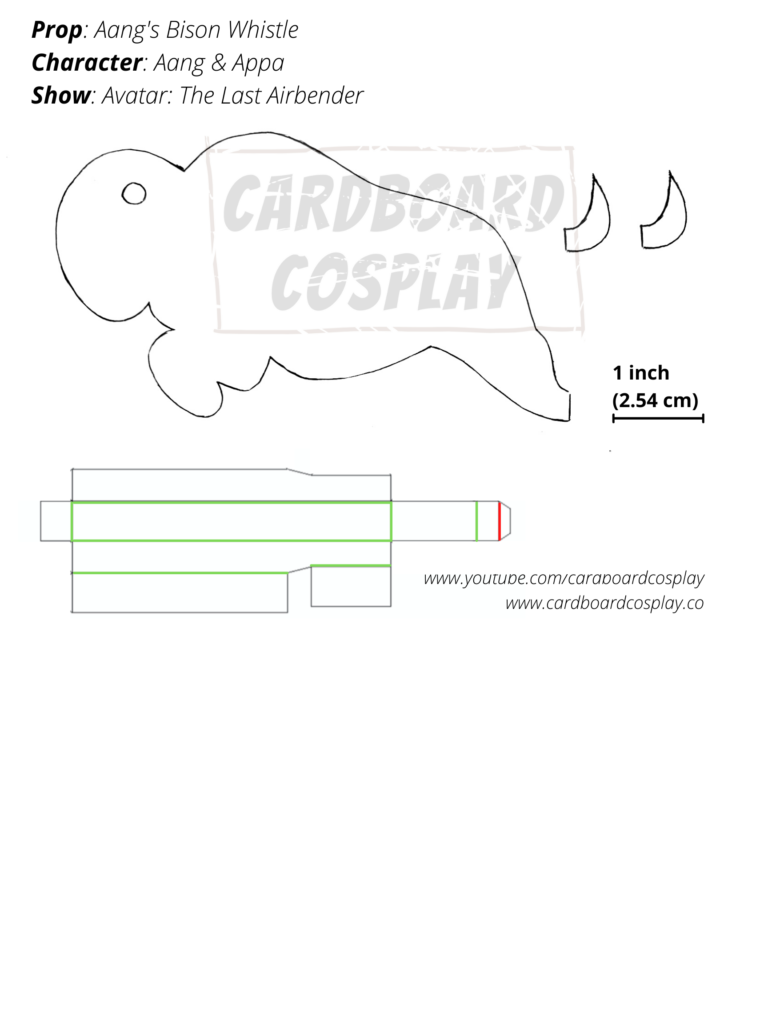
- Print out the whistle template.
- Cut all the extra paper away from the template and tape it to a piece of cereal box cardboard.
- Cut around the outside of the whistle. Do not cut the inside lines yet.
- When the whistle is cut out, cut along the inside lines but do not cut all the way through. You only want to cut just enough so the cardboard can bend easily. Follow the template – the green lines mean cut down from the front of the template, the red lines mean flip it over and cut down on the back of the template.
- When the lines are all lightly cut, fold in the “neck” portion. Keep it on a slight incline and hot glue it down. Let the glue dry completely.
- Fold up the sides and top of the whistle. Use masking tape to keep them all in place and wrap in masking tape until the entire whistle is sealed other than the mouth opening and air hole. Use the video tutorial linked above for guidance.
- Test the whistle to make sure it makes a whistling noise. Put it off to the side for now.
- If it does not make a noise it is likely because the folded neck portion from step 5 is not on an incline or two high, preventing air from getting through. Another error could be that the sides of the whistle are not sealed. You may need to try it again.
- Print out the bison template.
- Cut out and trace 2 times onto a sheet of cereal box cardboard.
- Cut out with utility knife and put off to the side.
- Cut 4 thin strips from a sheet of corrugated cardboard.
- Glue 2 of those strips to each side of the whistle to make it thicker. Make sure you don’t glue directly against the mouth portion of the whistle or it will feel a little awkward when you blow in it.
- When the glue is dried, glue the whistle to one of the bison cutouts.
- Measure thickness with a ruler. Mine was 1.1 inch wide.
- Take this measurement and cut out a long strip of corrugated cardboard. Cut into pieces and hot glue all around the entire perimeter of the bison. It should be the same width as the whistle.
- Hot glue the second bison cutout on top.
- To cover up all the corrugated cardboard pieces, first cut out a strip of paper/newspaper that can wrap around the outside of the bison. Fold it where it needs to be folded around the legs/head/back so it wraps easily.
- Cut out a strip of cereal box cardboard that’s the width of your bison whistle.
- Take the newspaper strip and put it next to the cardboard strip. Mark off where all the folds are located. Fold the cereal box cardboard in the same spots. It will now wrap around the bison whistle much easier and cleaner.
- Hot glue this strip onto the outside of the whistle.
- Paint everything in white craft paint.
- For the horns: cut from corrugated cardboard and wrap in masking tape to hide the corrugation holes.
- Paint horns dark brown.
- Hot glue horns in place, using the bison template from step 9 to help you space them properly.
- Enjoy!
*Optional – cut out a rectangular hole in the front of the whistle for airflow and so it matches exactly how the bison whistle looks in the show*
Template: